Monday, January 30, 2012

Finger Paints Artist's Sapphire & Pure Ice A List

Hello again!
Long time no see, hmm? I'm actually pretty proud of how consistent I've been in the last few days! I'll try to keep it up, but no promises! I live a pretty busy life and I have a lot to do everyday as I'm sure a lot of people do so y'all should understand.
Today I worked with Finger Paints Artist Sapphire and Pure Ice A List.

Artist's Sapphire: Honestly? Mine was crap. I guess after sitting on my shelf long enough and not getting it's needed amount of TLC, it just died a little bit on me. I did my best to make it work of course, but I will definitely be searching for a way to make it thinner. Other than that, it was great! It went on... smooth as I expected it to in that condition and the color is beautiful. It's a navy with a lovely subtle shimmer. After two coats, it was a done deal. I would definitely say if you're looking for a good blue, Artist's Sapphire might be for you.

A List: I'm pretty sure this isn't a brand that's seen a lot on nails. If I remember correctly, you can pick one of these babies up for pretty cheap at any Walmart. It's application was flawless though. It went on smooth and within two coats, I was a happy camper. Or polisher. It's a classic shimmery silver that almost has a blue hue to it, and it works great for stamping!

Check it out!


Artificial Lighting

So after this, I moved on to some nail art! I used Bundle Monster plate BM20. The only regret I have about this manicure is that I wish the stars could have been a wee bit smaller so more could fit on the nail, but beggars can't be choosers right? Right!
(I know I'm NOT a professional. And yeah all three of these pictures look pretty similar and that is EXACTLY why I put all three up! I couldn't decide which were the best so they all got to make their debut)


Artificial Lighting

So! Comments? Questions? Concerns?
See y'all next time!

Saturday, January 28, 2012

China Glaze For Audrey

Hey hey!
(if you don't want to read my rambling, skip this paragraph!)
SO this week I made a trip to my local Sally Hanson just to check out the goods, you know what I'm sayin'? And boy oh boy did I see a lot! Kinda. In their sale section, they had A LOT of the China Glaze crackles (metallic and regular) on sale for $2.99. I had the metallic Cracked Medallion in my hands ready to go but as I kept strolling, I passed by a rack of Seche Vite and underneath there was a coupon that said if I bought a Seche Vite top coat, I would get a China Glaze for free. So you know what I did? I picked me up a SV top coat! I've heard such good things about it, I've just never tried it. With me and my sister constantly painting our nails, we tend to bust through our top coat so I considered it an investment, not useless spending. So what free CG did I grab? Why none other than For Audrey! Check it out!

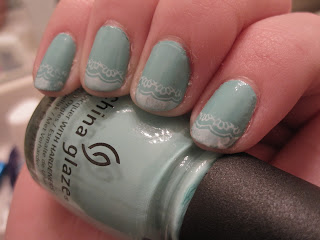
For Audrey is a beautiful light blue. It, of course, is named after Audrey Hepburn and Breakfast at Tiffany's. It is said to be a dupe of the classic Tiffany & Co blue, but it is not. Although it is definitely a relative, For Audrey is a bit more muted than the Tiffany blue.


When this color came out in 2007, it was a hit! I'm sure some of you remember it and how hard it was to come across at one point, but fear not! For Audrey is part of China Glaze's core collection now and definitely available at a Sally Hanson store near you. AND, if you go before February 1st, YOU TOO CAN GET SECHE VITE AND A FREE CHINA GLAZE! Do I sound like a sales person? Haha, but no really, if you're a fan of seche vite, it's a cool enough deal.


Application: It went on super smooth, however it did leave some streaks. For Audrey is definitely a two-if-not-three coater. Other than that, it was great. It's a gorgeous robin-egg-almost-Tiffany-&-Co-blue and I would say it's worth most of the fuss it received. Here it is. (no top coat and yes I'm aware my fingers look like they were in the sun all day. I have no idea why my camera has portrayed them as demon fingers but beggers can't be choosers)


Artificial Lighting
So to finish off this manicure, I Bundle Monstered it up using OPI Alpine Snow (of course) and plate BM18. I know it didn't come out perfect by any means but I hope you will all look past my obvious lack of official nail art training and get the idea of what I had intended the manicure to look like. Enjoy!

My Fail of a left hand. Artificial Lighting.


My better right hand, Artificial Lighting
And these picture are with Seche Vite as the top coat. I'm a definite fan now! It dried amazingly fast and adds a great shine. My nails feel sturdy too, I like I like!

Comments? Questions? Concerns? Lemme know!

Friday, January 27, 2012

Ew ... Bundle Monster

Hello hello!
I know it's been awhile.. and I had this manicure ready last weekend, I just never took pictures of it until a few days ago. I really liked it at first, but as one day turned into two... I started to really dislike it. Just take a looksie for yourself:


No Flash/Artificial Lighting for Both

The base is two coats of OPI Alpine Snow. 

The other nails have Avon's gunmetal. This color is a gunmetal (lol) grey complete with tons of little shimmers in it. It's an awesome color and it goes on great and even one coat still looks awesome and shimmery and smooth. I'll swatch it one day for you guys(: 


On my ring finger I have OPI Yodel Me On My Cell. Yodel Me On My Cell is a beautiful royal blue. It's shimmery and has a bit of green in it making it look a bit aqua. I'll swatch this one one day as well!
I wanted you to see the name and the color haha


On top of all the nails, I have New York Color 101A. This nail polish is so old that I actually have no idea what the name is other than 101A on the bottle. It actually ended up tinting my nails a bit yellow and as seen on the pinky, I smeared o: 

There was no top coat on this manicure. I never got around to it and eventually I just HAD to take it off. The plate I used what Bundle Monster's BM16. I hope you guys liked this manicure more than I did ! Comments ? Concerns ? Questions ? Lemme know! See y'all next time!

PS sneak peak at next time: can anyone say China Glaze For Audrey ?

Sunday, January 15, 2012

Chine Glaze Sexy Silhouette

Hello hello!
I'm pretty fond of the color I have for you guys this time! The color is Sexy Silhouette by China Glaze!


It is a beautiful bright fuchsia. After about two coats it's fine, but it is slightly sheer to the point where I could see my nail line underneath. That (and the fact I fell asleep right after painting and got scuffs and scratches on them) caused me to use three coats. I don't wear pinks a lot but I LOVE this one. It also has a subtle shimmer that is amazing. Sexy Silhouette is one of the core colors available at Sally's now, but it was originally from the Fashion Lounge collection. Check it out!

Artificial Lighting

Sunlight

So of course after I painted my nails this color, I had to spice it up a little bit(:

Artificial Lighting

On my pointer finger is the lovely Flurry Up! from Sephora by OPI. On the other three nails, I used these cute little decals my twin got me for Christmas a year or two ago. I was originally going to stamp my nails but then she requested I should use these so, I did! They are ridiculously easy to apply and I know they stay on quite well and for good periods of time from my previous experiences wearing them. You just take them off the sheet and plop them on! BUT BEWARE: once they're on ... they're usually ON. for good. I'm slightly clumsy with my hands so I'm always careful to be ... careful haha. And if you're wondering what they are...... they're these:

And yes, they were from Sally's Beauty Supply. So, what do you guys think? 

Friday, January 6, 2012

China Glaze Coconut Kiss

Hello hello!
I have a good post today! Or at least I think so. Recently I had an idea pop into my head that I could incorporate my favorite nail polish EVER on. That color is the one and only Coconut Kiss by China Glaze. It's a beautiful classic purple. It's not blue nor is it red tinted. Also, it has a lovely shimmer to it that literally, combined with it's color, made me fall in love years ago when I came across it. It is easy to apply, although there are some brush strokes. However, after a little bit of drying and a top coat, they're usually gone!
So here it is: the one and only Coconut Kiss!

Artificial Light
this is two coats by the way

Artificial Light and Flash (this makes it look bluer than in person)

Artificial Light

This one is pretty darn spot on to the actual color.


SO. Are y'all ready to see my stamping? I must say that my technique has improved since last time! It may not look PERFECT but I'm really happy with it and I can't stop looking at my nails! I used Bundle Monster plate BM16 and OPI's Alpine Snow for the design. I absolutely can not wait to do even more stamping. My mind is churning with ideas! Anyways, on to the goods:


Left Hand
Top: artificial light and no top coat
Bottom: artificial light and OPI top coat


Right Hand
Top: artificial light and no top coat
Bottom: artificial light and OPI top coat

Soooo what do you guys think? Comments, Concerns, Questions? Tell me what you think! And what's your favorite nail polish?

Monday, January 2, 2012

2012 starting with Sephora by OPI Flurry Up!

Happy New Years!
I ended 2011 and started 2012 with a mani consisting of a polish that is dear to me for certain reasons, OPI's Queen of West Web-erly. This color is from the 2009 OPI's Valentine's Day Collection. It's a gorgeous purple that almost looks magenta sometimes. Also, I had to use three coats to get rid of the brush streaks because it is a little bit sheer, but I still love it!

I was intending to do something else for this mani but.... I didn't. So I ended up letting it go top coat-less for awhile before I decided it was time to do something and by then the damage had been done, so please forgive me for the bad-ish pictures. (Later you'll see how I spiced it up for New Years with Sephora by OPI Flurry Up!) Also, this color is SO much prettier in real life. It really is a gorgeous purple shimmer.

bad light
sunlight
again

So after a few days of wear and tear and bumps and knicks that made my mani go... bad needless to say, I added a new member to my collection! I got Sephora by OPI Flurry Up! and I was dyinggg to use it so I did! What other than sparkles and glitter to hide a manicure's imperfections? Flurry Up! is a clear base with glitter and large hexagonal glitters. The large glitters had a tendency to go with the brush and and up at the end of the nail but after a bit of prodding and nudging, it was no big deal. So after I applied two coats of Flurry Up! and one coat of OPI's top coat (finally), I was ready to start 2012 with my new mani! (and I really did start 2012 with this, I did it on the 31st teehee) So! Here it is, Flurry Up!
bad lighting

epic -not really sun lighting (I thought it looked cool)

sun light
and again

AND NOW FOR THE WORST PICTURE OF ALL! The stars themselves, Queen of West Web-erly and Flurry Up!
yeah .... sorry about this(:
So I hope you guys liked this as much as I've been enjoying it. It's still on my nails and I often find myself just admiring it. Next time I'm thinking about trying some more stamping! My manicure before this was stamping and actually looked pretty darn good... I just never took pictures of it. Oh well. Tell me what you think!